Push And Pull The Right Way When Pedaling
A simple guide to push and pull pedaling technique for smoother indoor cycling, steadier cadence, and less wasted movement.
Published
Most riders hear push and pull pedaling technique and picture two hard moves: stamp on the pedal, then yank it back up.
That is not the goal.
A good pedal stroke should feel controlled, not dramatic. You still make most of your power through the front and down part of the stroke. The useful part of the "pull" cue is keeping the foot engaged as the pedal comes through the back half of the circle.
Do not chase a perfect circle. Chase steady pressure, quiet hips, and a stroke that does not go clunk, stomp, clunk.
The simple answer
Push and pull means drive the pedal through the front of the stroke and keep the foot active through the back. It does not mean equal force all the way around the circle.
That matters because the upstroke is easy to overcoach. Research on cycling technique has found that asking riders to pull up can improve mechanical force effectiveness, but it can also reduce gross efficiency. In plain rider language: you can make the force look more circular without making the effort cheaper.
So use the cue lightly.
Think about pressure, not force. Think about control, not violence. Think about avoiding dead spots, not lifting the pedal for free watts.
| Pedal cue | What it should feel like | What it should not become |
|---|---|---|
| Push | Firm pressure through the front of the stroke | Stomping straight down and rocking the hips |
| Pull | Scrape back and lift lightly through the rear | Yanking upward to create fake free power |
| Stay engaged | The shoe stays connected to the pedal through the circle | Fully unweighting the pedal and then catching it again |
| Smooth cadence | Quiet upper body and stable rhythm | Bouncing because cadence is higher than your control |
- Pedal cue
- Push
- What it should feel like
- Firm pressure through the front of the stroke
- What it should not become
- Stomping straight down and rocking the hips
- Pedal cue
- Pull
- What it should feel like
- Scrape back and lift lightly through the rear
- What it should not become
- Yanking upward to create fake free power
- Pedal cue
- Stay engaged
- What it should feel like
- The shoe stays connected to the pedal through the circle
- What it should not become
- Fully unweighting the pedal and then catching it again
- Pedal cue
- Smooth cadence
- What it should feel like
- Quiet upper body and stable rhythm
- What it should not become
- Bouncing because cadence is higher than your control
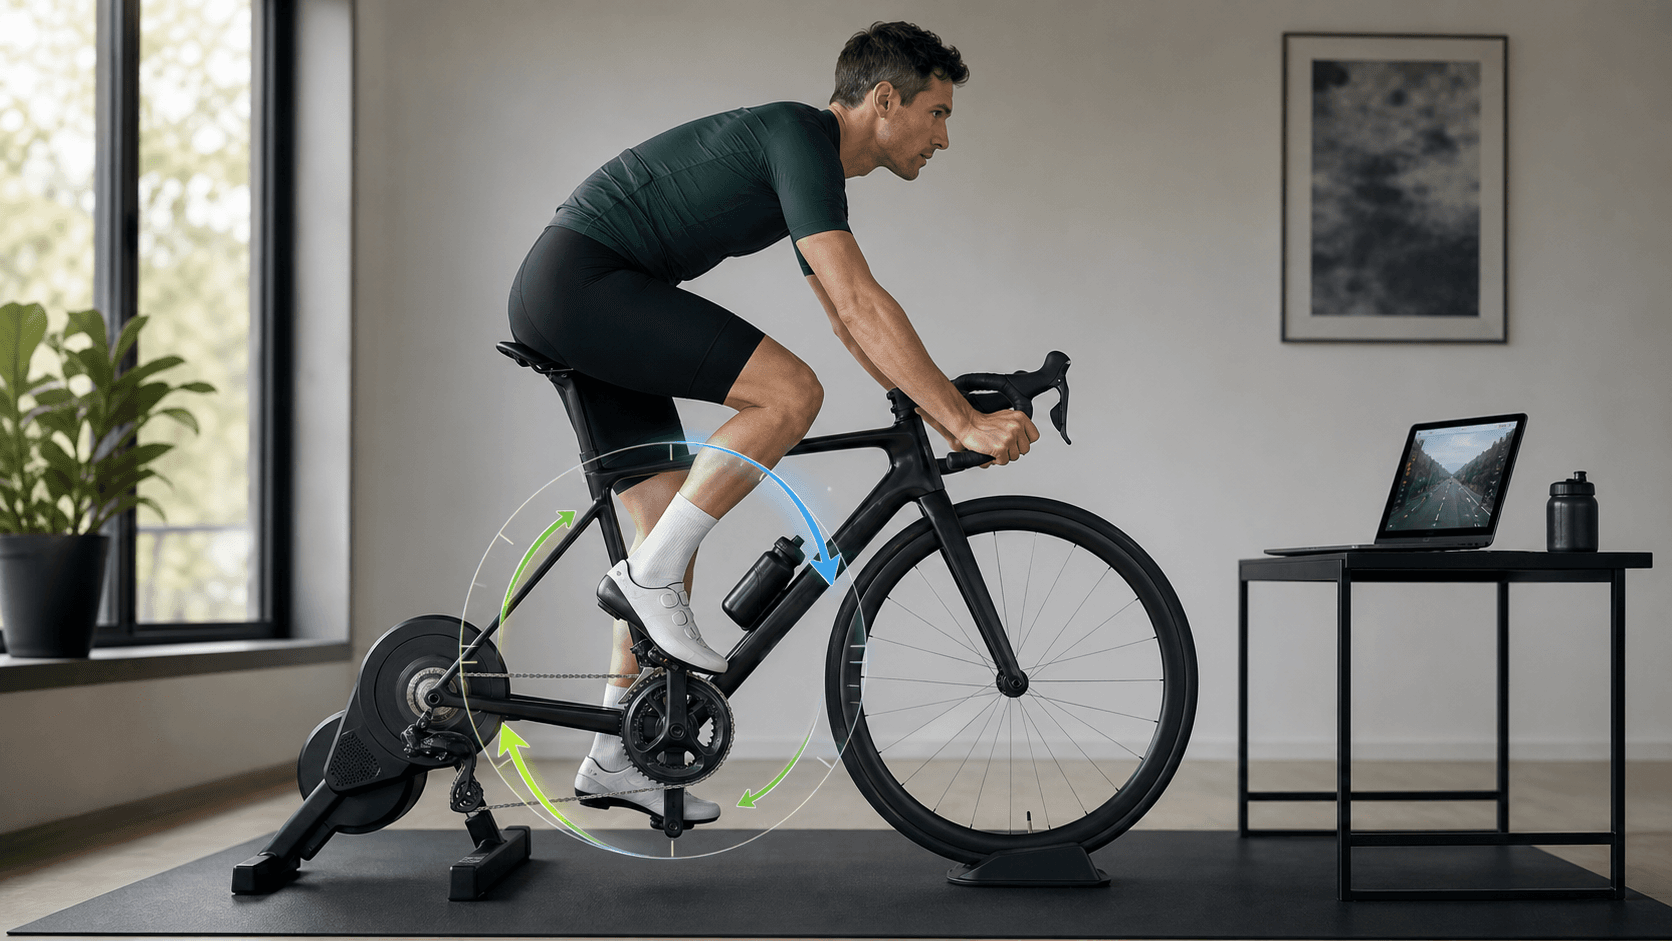
Pedal stroke by clock face
Picture the crank as a clock. The top is 12 o'clock. The front is 3 o'clock. The bottom is 6 o'clock. The back is 9 o'clock.
This is not a physics lesson. It is just an easy way to feel where your pressure changes.

12 o'clock: prepare and stay light but engaged
At the top, do not stomp early. Let the foot come over the top with light pressure. Your knee should travel cleanly forward. Your hips should stay quiet.
The cue is simple: roll over the top. Do not punch down before the pedal is ready.
3 o'clock: drive through the front
This is the strongest part of the stroke for most riders. Push through the front of the stroke with steady pressure.
Do not think "smash". Think "drive". If your upper body rocks or your hips jump, the push is too rough.
6 o'clock: transition smoothly
At the bottom, the pedal has to change direction. This is where a lot of riders lose contact and then catch the pedal again on the next downstroke.
Use a light scrape-back cue. Some coaches describe it like wiping mud off the bottom of your shoe. The goal is to keep tension through the transition.
9 o'clock: pull back and up without yanking
Through the back of the stroke, bring the foot back and up enough that it does not become dead weight.
This is the part many riders overdo. You are not trying to rip the pedal upward. You are trying to help the leg return smoothly so the next push starts cleanly.
Do this
Push through the front of the stroke
Put your main effort into the front half of the circle. That is where the body is strong and where the downstroke naturally does most of the work.
Keep the pressure firm but even. If the power number jumps and drops every second, or your cadence surges and fades, soften the push until it becomes steadier.
Pull up through the back of the stroke
Use "pull" as a light control cue. Pull back through the bottom. Lift lightly through the rear. Then let the foot roll over the top.
The best version feels boring. The chain stays loaded. The trainer feels settled. Your legs keep turning without a hard slap at the start of each downstroke.
Keep the foot engaged all the way around
The foot should stay connected to the pedal. That does not mean maximum pressure through the whole circle.
It means you do not let the pedal disappear under your shoe, then catch it again. You keep enough contact that the stroke feels rounder and more controlled.
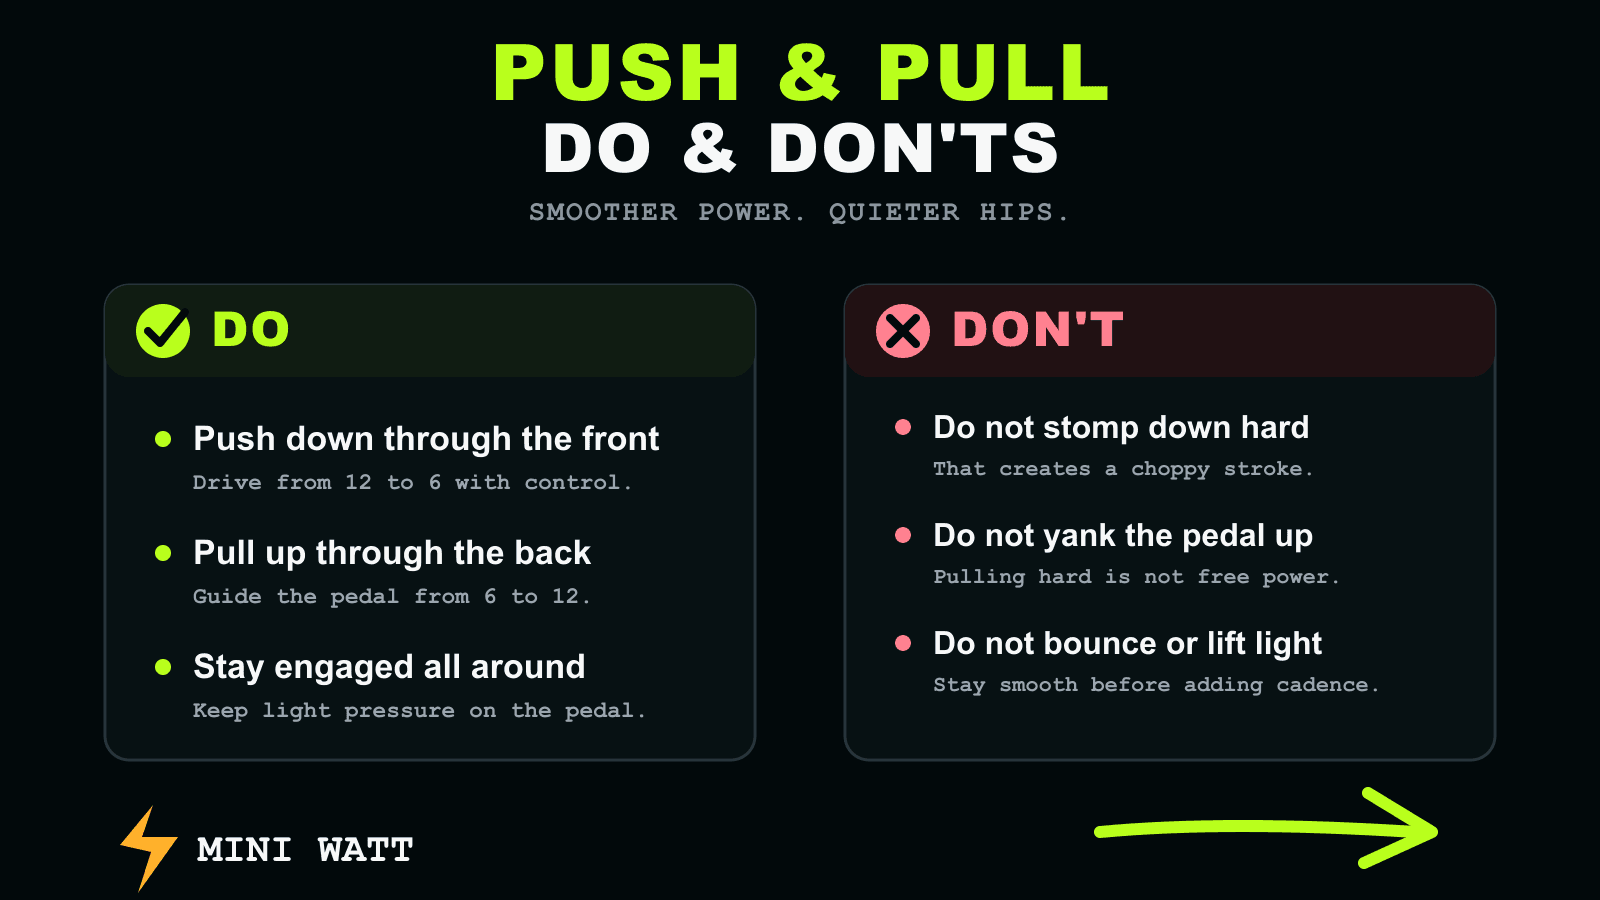
Do not do this
Do not bounce
Bouncing usually means cadence, resistance, or both are above your current control. It is common indoors because the bike is locked in place and every rough movement shows up.
If you bounce, lower cadence by 5 to 10 rpm. Relax your shoulders. Keep the hips heavy on the saddle. Build speed again only when the stroke is quiet.
Do not mash only downward
Mashing feels powerful for a few seconds, but it often creates a dead spot at the bottom and top of the stroke. The pedal slows, then gets hit again.
That choppy rhythm wastes movement. It also makes ERG workouts feel worse because the trainer has to respond to uneven cadence.
Do not lift the pedal with no pressure
Fully lifting with no pressure is not the same as pedaling smoothly. If the pedal gets light, then heavy, then light, your stroke still has gaps.
You want a little pressure through the whole circle. Not equal pressure. Not forced pressure. Just enough to stay connected.
Simple drills
Keep these easy. Technique work should not feel like a hidden interval session.
5 minutes easy spinning
Ride easy for 5 minutes at a cadence you can control. Watch cadence stability, not power.
If cadence jumps around, smooth the push. If your hips bounce, reduce rpm. If the stroke feels choppy at the bottom, add the light scrape-back cue.
Single-leg awareness drill
Use this only on a trainer or in a very safe place. Keep it short.
Ride easy. Focus on one leg for 20 to 30 seconds while both feet stay clipped in. Notice the bottom, back, and top of the stroke. Then switch sides.
If you do true one-leg pedaling with one foot unclipped, keep the resistance very light and stop as soon as you clunk, strain, or lose form. This is awareness work, not strength work.
ERG workout drill
Pick a low-cadence interval in ERG mode, around 60 to 75 rpm if that fits your workout.
Hold smooth pressure while the trainer holds the target. Do not fight the trainer with surges. Keep the hips still, push through the front, and pull lightly through the back.
This is useful because low cadence makes the stroke easier to feel. You can notice the dead spots without spinning so fast that everything blurs together.
Action plan: Practise smooth pressure in 4 steps
- 1
Start easy: Ride 5 minutes at endurance effort and choose a cadence you can hold without bouncing.
- 2
Watch one number: Use cadence stability as your first feedback cue before judging power.
- 3
Add one cue: Push through the front for 1 minute, then pull lightly through the back for 1 minute.
- 4
Test under load: Try the same cue during a low-cadence ERG interval and stop if your hips start moving.
How MINI WATT helps
MINI WATT helps because it gives you the right feedback without taking over the whole screen.
Use structured workouts when you want repeatable practice. ERG mode holds the target, so you can focus on how you apply pressure instead of chasing a number every few seconds.
Watch cadence and power together. If power is steady but cadence is bouncing, your pedal stroke may be rough. If cadence is steady but power feels spiky, soften the front of the stroke.
Keep the overlay visible during a workout. You can see the interval, power, and cadence while watching other content or keeping your desktop clean. That makes technique practice easier to repeat.
MINI WATT also supports real route riding, so you can practise the same control when gradients change. Smooth pressure matters on climbs, not only in neat workout blocks.
Smooth power beats wasted effort.
MINI WATT helps you practise steady cadence, ERG workouts, and real route riding without a full virtual world taking over the screen.
Common mistakes
Pulling too hard
Treating the upstroke like a second downstroke can raise muscle activity without making the effort easier.
Stomping the front
A hard downward stamp often creates saddle bounce and a choppy power trace.
Chasing a perfect circle
You do not need equal force at every point in the stroke.
Ignoring cadence
If cadence is unstable, smoothness is usually not stable either.
Doing drills too hard
Technique drills should be easy enough that posture stays quiet.
Practising bad reps
Stop a drill when you clunk, twist, strain, or lose control.
Expecting clipless pedals to fix everything
Clipless pedals help connection, but they do not automatically create good technique.
Looking only at power
Power matters, but cadence and body movement tell you whether the effort is controlled.
FAQ
What is push and pull pedaling technique?
It is a simple cue for applying pressure through more of the pedal stroke. Push through the front of the stroke, then pull back and lightly up through the rear so the pedal does not feel dead between power phases.
Should I pull up hard on the pedals?
No. Do not yank upward. Use a light pull cue to keep the foot engaged through the back of the stroke. Aggressive pull-up can change the force pattern, but it is not a simple way to get free power.
Does pulling up create more power?
Not in the way many riders imagine. Most useful power still comes from the front and down part of the stroke. Pulling up hard may make the stroke look more circular, but research does not support selling it as an easy efficiency win.
How do I pedal smoothly indoors?
Start with an easy gear or easy ERG target. Hold a cadence you can control. Keep your hips quiet. Push through the front and lightly scrape back through the bottom. If you bounce, lower cadence.
How do I stop bouncing while pedaling?
Reduce cadence by 5 to 10 rpm, relax your upper body, and keep your hips heavy on the saddle. If you still bounce, lower the resistance. Build cadence again only when your stroke stays quiet.
What is a dead spot in the pedal stroke?
A dead spot is a point where pressure drops and the pedal feels like it pauses, skips, or gets caught. Riders often feel this near the top or bottom of the stroke.
Are single-leg drills useful?
They can be useful for awareness, but keep them short and easy. Start by focusing on one leg while both feet stay clipped in. True one-leg pedaling should be light, controlled, and stopped as soon as form breaks down.
Should beginners practise pedaling technique?
Yes, but keep it simple. Beginners do not need advanced drills. Five minutes of easy spinning with stable cadence and quiet hips is enough to start.
Does ERG mode help improve pedal stroke?
ERG mode can help because the trainer holds the power target while you focus on cadence and pressure. It does not fix technique by itself. You still need to pedal steadily.
What should I watch during a MINI WATT workout?
Watch cadence first, then power. A smooth stroke usually shows up as steadier cadence, quieter hips, and fewer surges. MINI WATT's overlay keeps those numbers visible without filling the screen.
Sources
- Effect of pedaling technique on mechanical effectiveness and efficiency in cyclists, accessed 2026-06-02
- Effects of pedal type and pull-up action during cycling, accessed 2026-06-02
- Strategies for improving the pedaling technique, accessed 2026-06-02
- Physiological and biomechanical factors associated with elite endurance cycling performance, accessed 2026-06-02
- Cycling Drills in TrainerRoad, accessed 2026-06-02
- Master Your Pedal Stroke with Tips from a Cycling Coach, accessed 2026-06-02
- Four MTB Cadence Training Workouts, accessed 2026-06-02
- MINI WATT homepage, accessed 2026-06-02
- MINI WATT Workouts, accessed 2026-06-02